Reintroduction – New release site information
Congratulations on wanting to be part of this awesome program, my aim is to assist you and help prepare you with as much information as possible so you can see how our process works and what to expect so there are no surprises. This is a long running program and in the past 20 years we have managed to create a successful release prescription that continues to evolve and improve each year and should only be used as a guideline. If you have any questions at all please contact Kevin directly to discuss your concerns.
Automatic Feeders:
Purchased directly from: www.nosloc.com
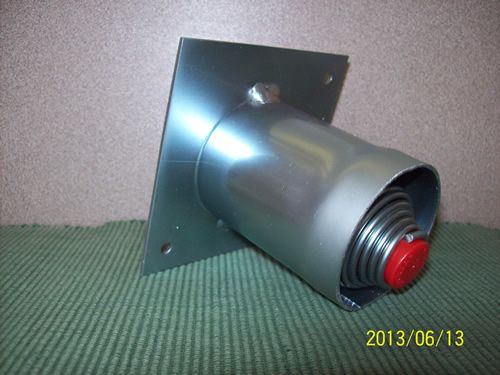
We use: 3mm pellet size, protected version, with bucket, waratah bracket & waratah
You will need 6 – 8 feeders spread around your release area to avoid pairs taking up a territory and excluding all other pateke from that feeder.
They can be placed either over the water like in the picture below or on land where they can easily been seen directly from the water, and with an easy access gentle slope so birds can easily see them, then walk up the bank to the feeder.
Feeders need to be checked regularly for blockages (check to see pellets fall out when you gently tap the spring), and there is enough food inside the bucket (remember the middle empties out first, so what my appear like a lot from the outside, may only be on the sides of the bucket and the middle has been used up so no actual food is falling out for the birds.
Mallard and Pukeko protection (cages)
These can also be purchased from Nosloc.com.
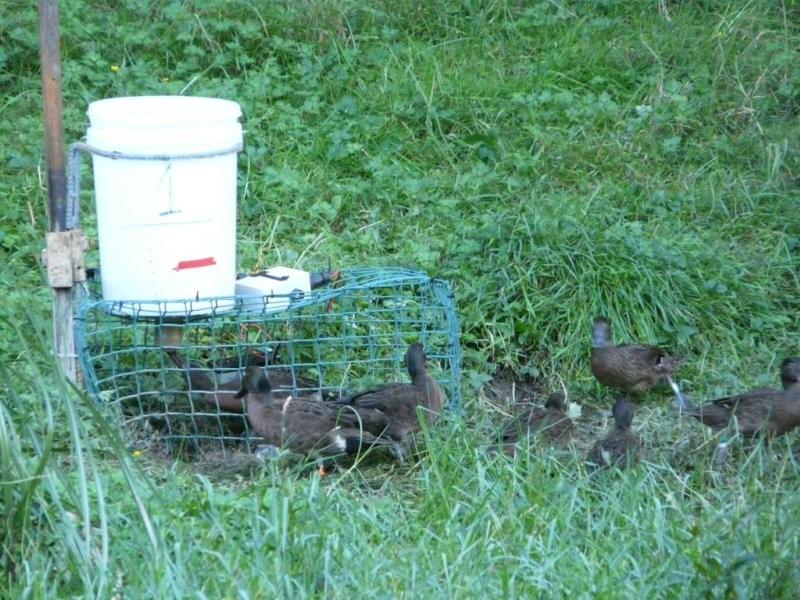
If you want to save money by not feeding Mallards and Pukeko you might want to consider making up an excluder cage like in the images below. Mallards especially are very quick to figure out the feeders have lots of food inside them, and what might start off with just a few mallards can easily attract hundreds of them in a matter of a few weeks. Not only does it cost you a fortune it makes it hard for the pateke to get a feed which is the whole point of the exercise.
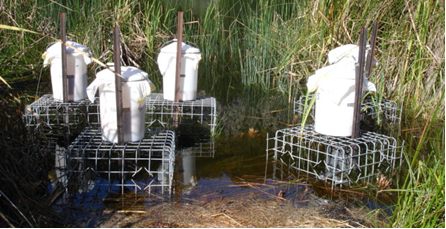
Information below from Matt Maitland
The reo-mesh is 75mm cell. Looking at the pic it is about 7 cells cubed being about 500mm each face.
The Tuhua model you can see the cut reo-mesh aperture to give 100 x 100mm duck access.
We also added a netball hoop on the warratah to help stabilise the bucket which slid down through this which you can see on the mesh version.
The pukeko exclusion alcoves I have no photo of. These were either plastic trellis or similar fashioned as a ‘porch’ around the entry aperture. This prevented puk’s putting their head through the duck entry and hovering up spilt feed and excluding pateke.
Below is a pic from the MSc study done on feeder use (The box on top of the ‘feeder use’ pic was a PIT tag receiver for an MSc study).
Order From:
07 878 6868
www.nosloc.com
Information updated 2/11/2016
Pateke Tx’s & Harnesses
Radio Transmitters (Tx’s)
It is your choice on which companies to use, but in recent years we have gone with ATS transmitters as their reliability and programming options have been a great option.

Tx – Specifications
VHF Transmitter A$355 each
A1320 Backpack Transmitter
40ppm 16g 850 days battery life
Antenna 1 1/2″ fit, 1″ spring, 10″ 140#, 15*
PET Mortality DC
12 hr 80ppm, 21 days lock, PET Intl 4 hrs (42 days)
Duty Cycle – 8 hrs ON
Frequency 160 – 161 MHz???
More Details:
Contact:
Craig Morrison
Phone: 0429 464299 (International; +61429464299)
Email: [email protected]
www.atsaustralia.com
Note:
When ordering Transmitters they must not be addressed directly to Peacock springs, as they need to pass through customs which is your responsibility to complete the necessary paperwork and associated fees (ie customs clearance fee & GST). Please order them at least 6 – 8 weeks prior to release date.
DoC sites: When the tx’s come into the country you will be contacted by a broker to pay the GST. Just do that with your P-card. You can claim back the GST component with the GL code 69905
Backpack Harnesses
You will need 1 harness per radio transmitter to attach to each bird.
We are lucky enough to have Max and Erina making backpack harnesses for the project in their spare time, please give as much notice as possible, ideally 12 months in advance.
Contact:
Andrew “Max” Smart
Ranger (Biodiversity) Fiordland District —Taonga rāhui
Department of Conservation—Te Papa Atawhai
DDI: +64 027 2028971
Te Anau Home Base PO Box 29, Te Anau 9600
Lake Front Drive, Te Anau 9600
T: +64 3 249 0200
NOTE: Although Max and Erina work for the department, this being done purely as a hobby and are the only people supply me this service, so DOC staff do not try and charge harnesses through WBS centers or expect it done ass part of their work time. Please do not make an issue of this as they also supply all my other projects with harnesses and I have no other alternative source as sirtrack no longer provide them.
Alternative TX providers:


Information updated 2/11/2016
Predator Control
Thanks to Steve at EcoWorks for letting me use the below information on trapping, we are lucky that Steve’s many years of trapping have resulted in a similar mindset to the recovery groups, and his standards and professionalism towards trapping is next to none.
It brings together many years of experience in the form of a ‘recipe’ for each pest control task. This however is an evolving document; as new methods and trap designs are developed and we discover more efficient practices this manual will be updated to ensure that we are producing best practice methods and results to protect our wildlife, wetlands, beaches and forests.
Please remember that it doesn’t matter how good you think your trapping program is, once we release the first 20 pateke into your site, it is how many birds survive the first 12 months that really tells us how effective the trapping program is. If you start seeing deaths please be in a position to take action to try and rectify the problem by communicating death immediately to Nigel and Kevin and take photos of the dead birds where they are found (including a close up pictures and wide angle situational awareness shots) which can help identify if it is mustelid control or cat control that needs more effort (rouge trap shy stoats can be hard to catch).
1.0 Mustelid Control (ferret, Stoat, Weasel)
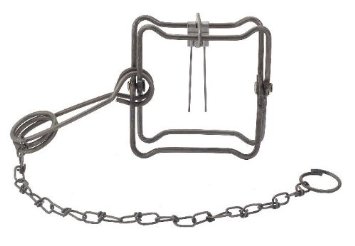
1.1 Trap Type
No.6 Fenn Trap DOC 200
Currently the most effective kill traps for stoats and weasels are the No. 6 Fenn, DOC 200 or DOC 250 kill traps. Two traps are positioned inside a wooden tunnel. This is a for a number of reasons (a) it allows target specific pest control (b) it reduces non target kills and ensures protected species, people and pets are not damaged (c) the tunnel protects trapping equipment from rain and salt spray and (d) tunnel screens allow the trapper to direct the target pest onto or over trip plates in a more accurate way. Alternative traps include the DOC 250 designed for ferrets and feral cats.
1.2 Wooden Set
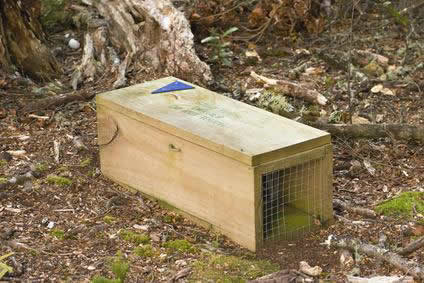 The trap set is a wooden tunnel 600mm in length by 250mm wide. It is made of treated H3 radiata pine or 12 and 17mm plywood. Both 200x25mm for the sides and 250x25mm rough sawn H3 for the top and base. The box is screwed together using square drive screws.
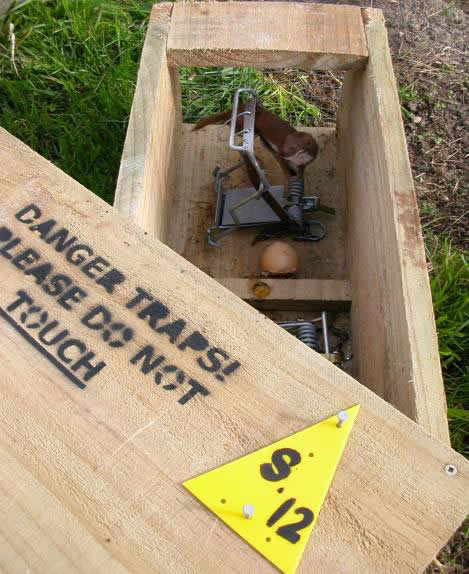
The lid is made of 17mm+ plywood and cut 600x 250mm. A warning sign must be stencilled on the lid with black spray paint:
DANGER TRAPS
PLEASE DO NOT TOUCH
A plastic triangular track marker or cattle ear tag marker must also be screwed to the lid with the trap number on it. The lid is screwed at diagonally opposite corners with a square drive 40mm screw to prevent access to anyone other than the trapper.
1.3 Netting Hole size
 In areas where wildlife requires protection, i.e. tuatara, kiwi, petrel etc a small sized hole is required to prevent the entry of wildlife you are trying to protect. Where weka are present an 800mm long wooden tunnel is required. In sensitive areas a hole 50mm x 40mm will allow access to all mustelids and keep out wildlife species.
Netting is cut cleanly so that no sharp pieces protrude and may interfere with the easy access for mustelids.
A hole must be cut diagonally opposite at each end of the tunnel so that the mustelids can see right through the trap tunnel and see an exit point at the opposing end.
In areas where sensitive wildlife species are not present; larger holes can be cut up to 120 x 120mm to allow access for feral cats and hedgehogs.
Where people or farm stock are present a warning sign must be posted at entry points to the trapping area and the tunnels themselves should be attached to a tree or fence post with a square drive screw, chain and staple or coach bolt. Cattle are very inquisitive and will disturb trap boxes.
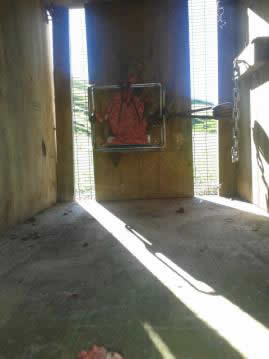
Photo: Weasel in Fenn tunnel. Traps sitting square, tunnel floor is clear of debris and warning sign is present.
1.4 Trap and Tunnel Management.
(1) Wooden tunnels must be set on a level surface. They must be firm and stable on the ground with no movement. This very quickly turns shy animals off entering a trap box.
(2) Trap lids must sit flat and firm. Buckled lids must be replaced.
(3) Lids need to be repainted with the correct station colour green paint and stencilled with a warning sign.
(4) The traps must be set in the centre of the tunnel. They need to be placed on either side of the egg/meat bait and in opposite directions. The traps must be positioned so that trap arms are 20mm away from the egg and sitting square in the box. Correct trap placement in the tunnel is vital when trapping stoats and weasels.
(5) Ideally fresh rabbit bait is positioned dead centre of the tunnel. The egg sits in a 20mm hole drilled into a small piece of ply and screwed to the floor of the tunnel. A hole is poked in the top end of the egg before it is placed into the trap tunnel. This is important as it allows egg scent to carry more effectively. White hens eggs should be used if available. Traps require clearing and baiting fortnightly.
Also position minced chicken or salted rabbit beside A no.5 hen’s egg as an alternative bait and a small quantity (20c coin size) of pre feed just inside the tunnel entrance as an alternative mustelid attractant. Do not use fish in mustelid tunnels.
(6) Trap tunnels need to be scraped clean of rat hair, hedgehog spines and other foreign matter, inside and out. Use a paint scrapper to clean the tunnel floor during each trap check.
(7) The brass trap ‘dog’ and the hook must be lightly filed fortnightly so that they are free of corrosion and trip efficiently under the lightest touch. Weasels are extremely light footed and fast, traps must be set to cater for this.
 Fenn Traps sitting square in a tunnel note that the springs are on opposing sides of the tunnel and placed 20 mm either side of the bait.
(8) The tin trap plate must also be scraped clean both top and bottom with a small wire brush removing built up grime.
The trap plate hinges must be checked and cleared of cobwebs with a small wire brush and other debris so that it operates easily. If the trap plate is not sitting flush with the trap arms of the Fenn trap when set, it needs bending into place so that it does. Use black flag around the trap box if spiders and other invertebrates are clogging the box. Do not spray bait or traps though.
(9) Set all traps extremely finely and on the very tip of the brass dog so that the lightest touch from a small weasel is enough to trigger and catch quickly and smoothly.
(10) Again, the tunnel must be clean and clear of debris including grass at the entrance way, old rat hair, hedgehog spines etc. Traps need to be kept clean and free of unwanted debris allowing un-restricted access for mustelids and so that they can see an easy escape route at the opposite end of the tunnel.
If trapping in grassland use a 1% Round-up mix around the tunnel. Spray c.300mm out from either end of the tunnel and a strip c.150mm wide along the sides of the tunnel. This means grass will not inundate the trap between checks and the trap will look well presented and set up professionally.
1.5 Trap Spacing and Placement
Trap Tunnels need to be spaced at a distance of 200 metres. This should be measured by doing a ‘go to’ on your gps. Sometimes trap tunnels are positioned closer than 200 metres to protect high value site, i.e. pateke and penguin. Generally any less and it is inefficient and any more and female stoats and weasels can be missed because of their smaller territory.
Trap lines are run centrally along valley floors, preferably near a stream, beside wetland rushes or down ridges and major spurs on hill country. Valley systems require only one line to be run centrally along its floor even if a major river system is present. Rivers and Streams are no barrier or deterrent to the movement of mustelids. Mustelids will generally always take a route free of wet rank grass however; looking for cover such as rushes, forest edges etc. where both food and cover are available. Cats and birds of prey can target stoats and weasels so they are also looking for cover.
Traps must be placed in accessible and visible locations. Visual and olfactory senses both play a key role in attracting mustelids. It also means you can find the trap again. Trap tunnels should be positioned on or near existing animal runs such as possum runs or stock trails, human trails or roads.
These are routes which different animal pest species in the area will prefer to use.
Another good site to position tunnels is near log piles or clay banks, or natural features which hold prey species or routes which mustelids and/or other animals may tend to use.
Trap tunnels must be free of grass and vegetation in and around the tunnel and more importantly the tunnel entrance.
Trap boxes must be moved every 3-6 months. If you get to a point where a particular trap is not catching or catch rates have slowed then move the trap just a few metres (5-10 metres) and it will often start catching again.
Take your time, manage your traps well, be proud of your sets. It is far better to have half of your line set as well as you possibly can, than have the whole line set poorly.
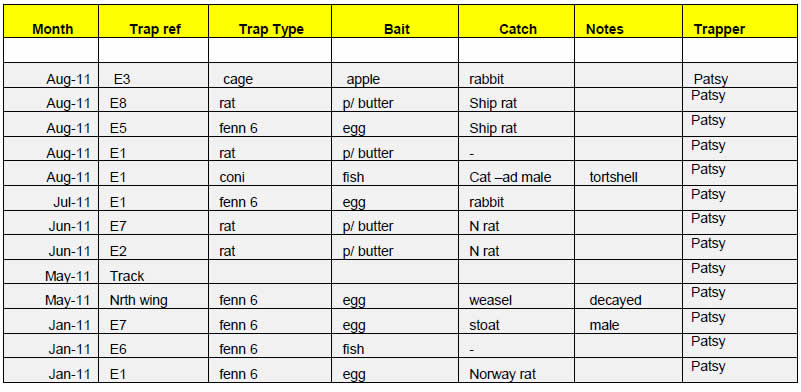
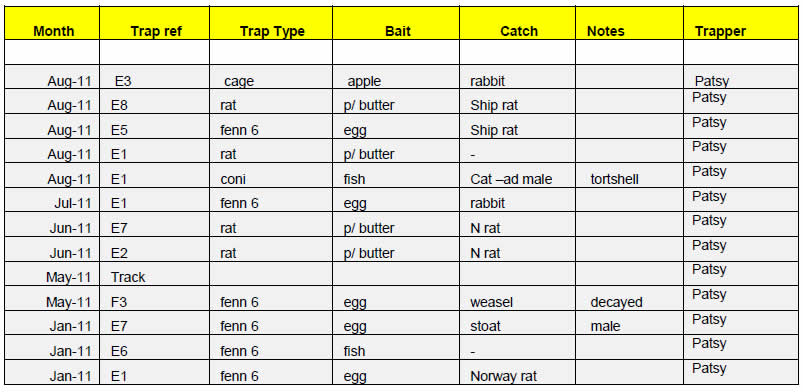
1.6 Trap Catch Recording
All trap catches must be recorded on an excel spread-sheet (below). The data to be recorded must include:
1) Date Caught
2) Trap No.
3) Sex
4) Species
1.7 Species Identification.
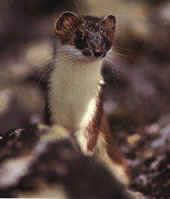
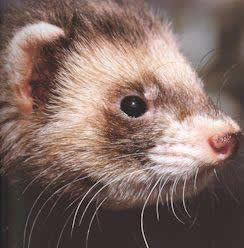
Ensure you can identify the three species of mustelid in New Zealand effectively prior to starting a trapping programme. If you cannot then ask.
Stoat Ferret Weasel

2.0 Feral Cat Control
Feral cats in New Zealand are a severe threat to native and endemic fauna.
They are known to kill many species of NZ wildlife including pateke, kereru, kiwi, petrels, skinks and geckos, kakapo, saddleback, stitchbird, weta and even native fish species.
Cats are long lived and can have a large home range. Radio tagged males in the Whitikau Valley, Opotiki, had a territory of 350 hectares. The largest feral cats captured at Motu have been in the 4 kg range. One caught at Waikaremoana during 2003 and another at Longbush Reserve weighed 6kg.
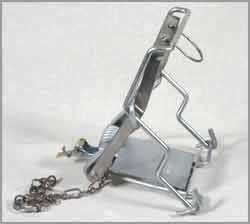
2.1 Trap Type
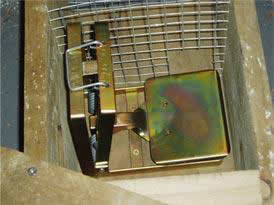
A number of trap options are present at the moment. The modified Connibear 110mm or 220 kill traps (below) are excellent options and used throughout New Zealand by a number of organisations to control cats. There are a number of ways in which these traps should be set. More details on the Connibear trap can be found here
2.2 Bait Type
Baits include either finely chopped pilchard, chicken mince and seafood flavoured tinned cat food, or minced rabbit/hare. Tuna oil is a good addition to fish based baits and can be applied to fence posts, trees etc. to lure cats.
A small quantity of bait is positioned in front of the trap forks as a ‘taste’ for the cat. The majority of the bait is positioned behind the trap forks on a tin plate.
Pre-feed must also be laid on the ground below or in front of the trap and on the ramp leading up to the trap itself or if you are using a box trap bait should be laid in front of the entrance tunnel and inside the door.
One large piece of bait is not effective as it can be dragged away by rodents or a cat in one action. Small pieces of minced bait require the cat to return several times meaning more chance of capture.
Important– Ensure that the cat cannot remove all of the bait without hitting the trap forks. The bait plate must be set at the correct height and the trip forks should be c.40mm apart at the base.
2.3 Connibear Trap Management – refers to all three trap set designs.
1) Remove lid screws with battery drill for boxes.
2) Spring Connibear Trap every time you visit and rebait the trap, i.e. every 2 weeks.
3) Remove all old dried bait and cats! Record in notebook, colour, sex, age, date and other notes. Cat sign in area etc.
4) Scrape the box clean of detritus.
5) Re-shape the tin trap bracket so that it will hold the trap firmly. Do not use nails or wooden brackets to hold traps they get caught by the trap jaws and cats will escape and never go near a trap again.
6) Wire brush trap and spring.
7) Open trap and rub your finger oil over stainless trip bars. Do not spray any other oils or lubrication onto the trap.
8) Ensure the ‘forks’ swing freely.
9) Apply ample amount of bait to top of tin plate and smear it up the wall behind the trap so that the cat has to work hard to get at the bulk of the bait.
10) Reset the trap and install firmly into tin plate. Use setting tool if required.
11) Spray black flag around box to remove spiders, spray roundup around box.
12) Ensure trap box is stable and firmly positioned on flat ground.
13) Spray Round-up™ to reduce rank grass around trap and easy access for pests.
2.4 Connibear Raised Set.
When kill traps are set in an area where farm dogs, children, ground nesting birds or other protected species are present then traps can be set at least 1 metre above ground level. In weka areas traps need to be 1.6 metres above ground level.
Traps are set at the top of a wooden ramp. The ramp is an 800mm length of 150 x 25mm H3 radiata. It runs at a 10-15º angle and extends from the tree, 40mm below the trap, and the lower end is nailed into the top of a 50 x 50mm tanalised wooden fence batten driven into the ground to a depth of 200mm (Refer photo attached).
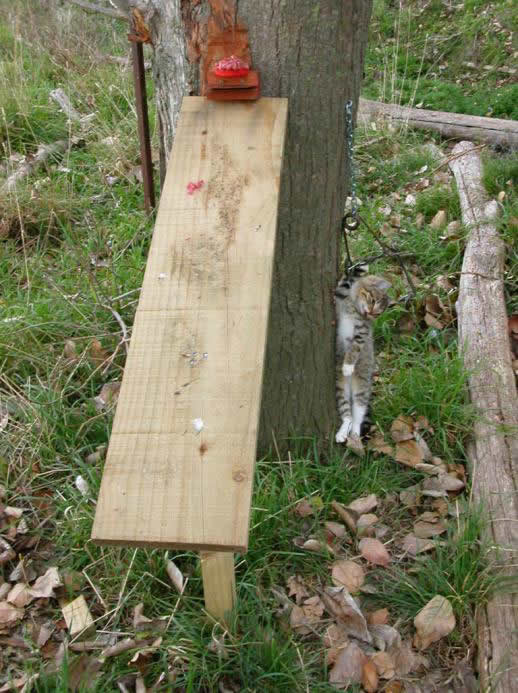
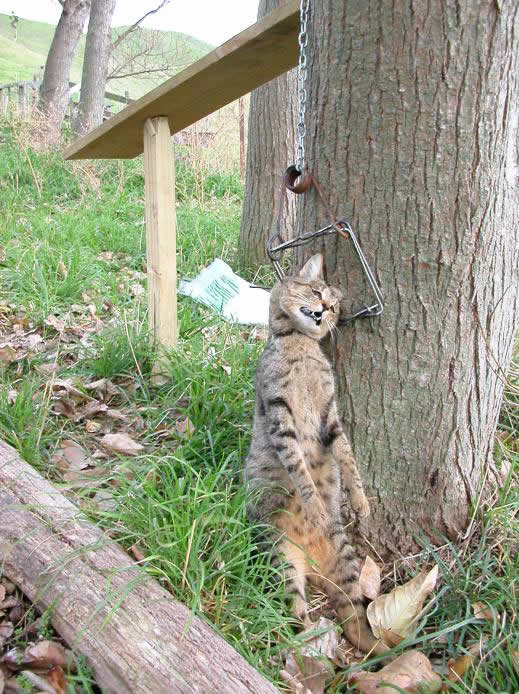
Correctly set raised cat trap designed so that the animal is caught by the neck and hangs free in the trap.
Warning – This trap design can catch harrier’s (Circus approximans) so this set is best suited under tree cover.
2.5 Connibear Ground Set
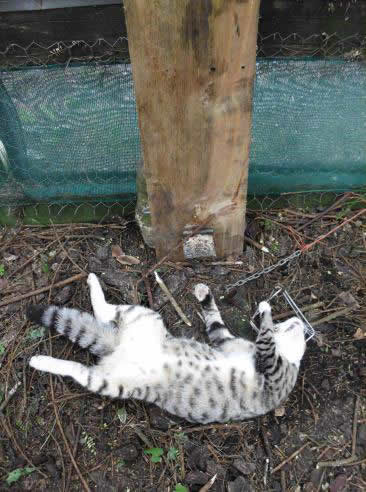
Ground sets are placed where no other protected species, farm animals or children will be present.
The setting procedures are identical to section 7.2.2 however the bracket is screwed to a fence post or tree 120 mm above ground level.
No ramp is used.
Baiting procedures are also similar.
Pre-feed bait must also be laid on the ground in front of the trap.
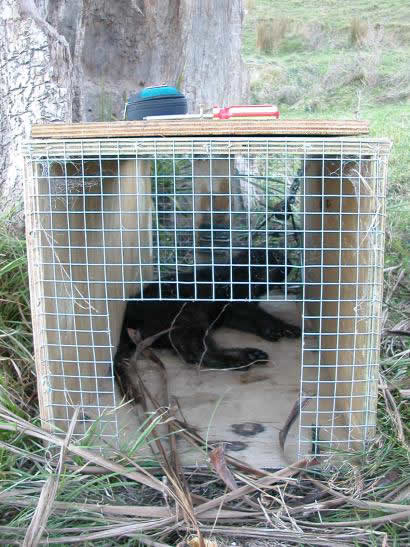
2.6 Connibear Box Trap
A box trap is a large plywood box with a connibear trap positioned at one end. The box is made of tanalised H3, 17mm plywood. The dimensions are 400(width) x 400 (height) x 800 (long).
Both ends of the box are covered with 13mm square aviary mesh batten stapled in place. The mesh at one end of the box has
A hole cut into it at bottom centre, which is 250mm x 250mm to allow un-hindered access for cats.
The other end of the box is closed with a central piece of ply to hold the trap bracket.

2.7 Trap Spacing and Position
Traps should be spaced at 300-400 metre intervals or at a density of 1 per 5 hectares. Traps should be positioned near established walkways or animal runs and tracks as cats prefer using human walk tracks, roadsides, sheep tracks, animal runs etc. Small blocks of forest <5 ha should contain at least one trap unless high intensity trapping is required to protect target species, i.e. Blue penguins and Nicks Head Enclosure.
In larger blocks of forest, traps should be positioned on dry ridges or existing game trails or trapper’s tracks. Cats do not like swamps or wet country. Traps should also be established on the perimeters of larger blocks. This is an area where there is often a greater diversity of wildlife and therefore numbers of rodents are high, producing an attractive feed site for feral cats.
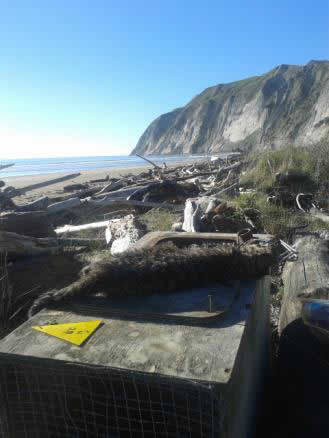
Coastal areas should have traps positioned behind the high tide mark (right).
2.8 Warning Signs
Warning signs must be visible at public access points into the control area to warn visitors about the presence of kill traps.
2.9 Trap Catch Recording
All trap catches must be recorded. The data to be recorded must include:
1) Date Caught
2) Trap No./Location
3) Sex
4) Any other relevant details, weight, colour, gut content.
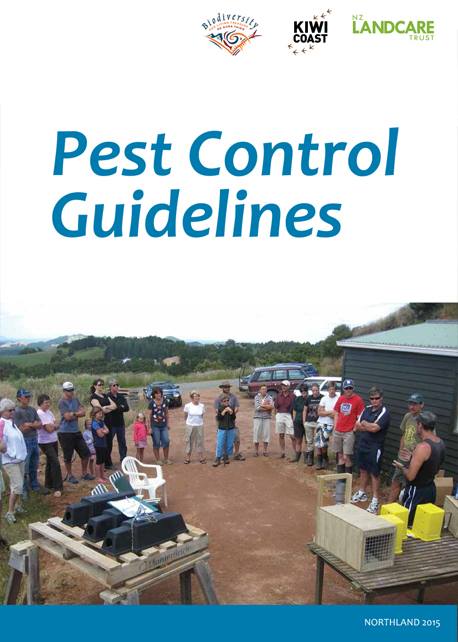
Another Great Resource on Predator control is the Kiwi Coast – Pest Control Guidelines 2016
Habitat requirements
Pāteke can adapt very well to the New Zealand rural landscape. A self-sustaining pāteke population requires a large area (usually several hundred hectares) and this may span several properties. Consequently, landowners and groups often need to consider management issues beyond their immediate properties.
The critical requirements:
• Foraging habitat is diverse, including all or most of the following habitats: – areas of low-lying fertile floodplains with many permanent and ephemeral wetlands – seasonally damp, grazed, fertile pasture (rank grass is impenetrable and provides less food) – ability to retain moisture levels in dry periods – floodplain forest, e.g. stands of podocarps and other tree and shrub species (Coprosma etc) along valley floors, all providing fruit for pāteke – proximity to estuaries
• Suitable nesting and roosting cover (e.g. riparian areas of sedges, rushes and other dense ground vegetation) near the open water, wetland brood-rearing areas, and wetland feeding areas
• Potential flocking sites at permanent, undisturbed, water bodies containing marginal cover and safe resting areas

WETLAND RESTORATION. A HANDBOOK FOR NEW ZEALAND FRESHWATER SYSTEMS
Wetland Restoration: A Handbook for New Zealand Freshwater Systems brings together expertise from specialists and groups actively engaged in restoring wetlands throughout the country.
The handbook builds on regionally based restoration guides and provides a detailed, comprehensive ecosystem approach toward understanding, protecting and enhancing our remaining wetlands. It is targeted at those who plan to, and those who already are making a difference to improving wetlands, and is written in a way that can easily be understood and importantly, acted on.

TE REO O TE REPO: THE VOICE OF THE WETLAND
Wetland health & Cultural wetland values
The handbook highlights a range of mahi (work) undertaken by iwi (tribes) and hapū (sub-tribes) to increase the health and wellbeing of their repo (wetlands). Information shared includes processes for facilitating renewed and vibrant connections between whānau (families) and their resources, understanding our cultural resources, and learning from case studies on wetland restoration, cultural indicators, and monitoring, all led by or in collaboration with tangata whenua (indigenous people).
The articles are written by Māori researchers as well as scientists who work with iwi and hapū partners. The handbook aims to provide best practice techniques for the enhancement and protection of cultural wetland values to share with tangata whenua throughout the motu (country). It will also assist local authorities, research providers, and community groups in their understanding of cultural priorities for wetland restoration.
More topics to follow when I get time:
release strategy (and load release strategy into this page)
Monitoring requirements – tx manufacturers, receivers & aerials, harnesses, technology, annual return
Translocation Proposals – recovery group example, previous proposals
Process – draw a process map, selecting release site, nosloc feeders, teal pellets,
What to expect on the day – process leading upto receiving birds at the airport, first releases, transporting, releasing techniques, feeders, speeches, returning transport crates, iwi
Who does what
FAQ
Established Release Sites:
Flock count Data